
If you’re looking for a smart lock that you can control with Alexa (or Google Assistant) for a driveway, fence or pool gate you are in the right place. This solution is great for anywhere you want to restrict access, but also want voice and remote control.
This Smart Gate Lock System is perfect for a variety of applications where access control is needed
- Back Yards
- Pools
- Play Grounds
- Tennis Courts
- Boat Docks
- Gated Parking Lots
Pairing this gate lock with a smart doorbell is a great way to see who is there and control access all from your smart phone or and Echo Show or Dot. Check out this article for my favorite smart doorbell.
It’s easy to find a lock for a fence or gate with a keypad, or hardwired button.
With so many household devices becoming “smart” you would think a smart gate lock would be easy to find. Unfortunately, no one has created one yet, but you aren’t out of luck.
I have found a way using 2 products to have the ability to remotely control gate access with your smart phone or virtual assistant.
Here’s all you need:
Update December 2018: I originally recommended the G0-Control relay module. It seems to be unavailable so this article has been updated to use the FortrezZ MIMO Lite relay. The information regarding setting up the Go-Control module can still be found at the end of this article.
How the Smart Gate Lock Works

The Bulldog gate lock includes a keypad that mounts outside the gate and a switch that looks like a garage door button that mounts inside the gate.
We will connect the Z-Wave relay to the same wires you connect the button to, this way the button and the relay can both activate the lock.
This gives you 3 ways to unlock the gate, the keypad, button or the Z-Wave Relay. To use the relay, you will need a smart home hub that works with Z-Wave devices.
If you already have one great, if not, click here check out my review of the best smart home hub for Alexa.
Check out the Bulldog gate lock in action
Setting up the Gate Lock and Smart Relay
Installing the BullDog Lock (FM145)
Installing the gate lock is pretty simple. The lock bolts to the gate, while a receiver attaches to the stationary part of the fence next to the gate.
Next, you will have to install the keypad on the outside of the gate. This should be close because the time to open the gate can only be set between 1 and 9 seconds before it will lock again. A wire connects the lock to the keypad.
The last step is to locate the button on the inside of the gate. This could be mounted directly to the inside of the fence, or on a nearby building or post. Remember you will be running a wire from the keypad to the button. The 9-second time to open the gate applies to the button as well so don’t put it too far away.
Options for powering the Bulldog Lock
The Bulldog lock is powered by 4 AA batteries in the keypad. Mighty Mule has 2 options if you don’t ever want to change batteries. If you use either of the options below you need to use rechargeable batteries in the keypad.
- The first option is a power supply that plugs into a standard wall outlet. The downside of this option is if your gate isn’t close to an outlet you have a long wire to run between the power supply and the keypad. See the power supply on Amazon
- The second option is a solar panel. If you get plenty of sunlight this is a great option. See the solar panel kit on Amazon
You can download the Bulldog Pedestrian Gate Lock Installation Manual Here
Installing the FortrezZ MIMO Lite Relay
Powering the relay
The MIMO Lite has to be powered from a 12VDC power supply. I suggest getting a power adapter that can be installed inside of a weatherproof enclosure. This Joylit 5A power supply is inexpensive and has plenty of power.
Wiring the MIMO Lite
The relay module has 4 terminals you need to connect to for this application.
- Power +
- Power –
- COM
- NC
The power terminals are where you will connect the 12V power supply to power the relay. You will have to cut the plug off the 12V power supply cable to attach the wires to the relay module. The COM and NC terminals are the relay output to activate the gate lock.
The relay has a small jumper (P5) shown below in the wiring diagram. This sets the mode of the relay to momentary, meaning it only turns on when you tell it to. Or to Latching where it turns on and stays on until you tell it to turn off. For our use we want to remove the jumper to use the relay in momentary mode.
Mounting the Contact Module
The relay and power supply need to be protected from the weather and the electrical connections should be made inside of a junction box. If you use a weatherproof box you can locate it inside or outside.
When selecting a location consider that you need to connect a wire between the keypad and the module, but the module also needs to be in range of your smart home hub or another Z-Wave device.

This box is large enough to hold the module and power adapter, it’s also made of plastic so it won’t interfere with the Z-Wave communication.
You can download the FortrezZ MIMI Lite Z-Wave Contact Module Installation Manual here
Wiring Diagram
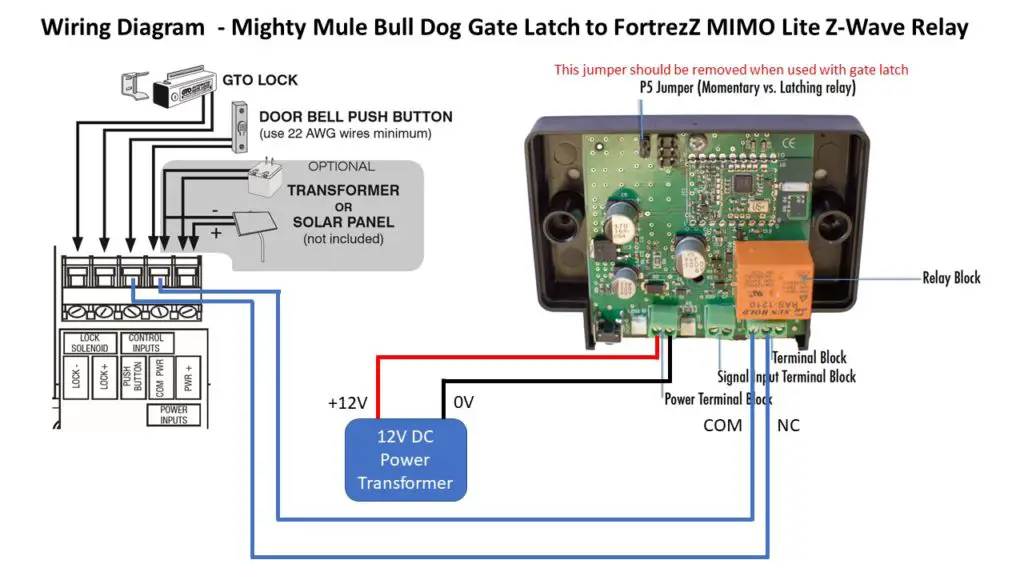
smart gate lock wiring diagram with FortrezZ MIMO Lite
Remote Control of the Gate Lock
All that’s left to do now is setup your smart gate lock.
First, link the relay module to your smart hub. To link the module, press the button on the front and then add the device using your hubs app. Name the module something like “Gate” or “Fence Lock”.
Next, open the Alexa app and search for new smart home devices, you should find the newly added gate lock module.
The last step is to create a routine in the Alexa app to unlock the Gate.
- Open the Alexa App, press the menu button and select Routines
- Press the + button to create a new routine
- Click the + next to “When this happens”
- Click “When you say something”
- Type “Unlock Gate” (or whatever you want to tell Alexa) and press save
- Click the + next to “add action”
- Press Smart Home
- Press Control Device
- Select the Gate Lock Module
- Select “Turn Off” and press Next
- Press Add
- Click the + again to add an action
- Click Smart Home
- Click Control Device
- Select the Gate Lock Module
- Select “Turn On” and press Next
- Press Add
- Press Create
Note: the off command is entered in the routine before the on command, but when you look at the routine the top command should show “turn on” then the command below will show “turn off”. This allows the module to recreate the action of pressing and releasing the gate button.
You could also create the routine in your smart home controller and then just activate it from Alexa. Just remember that you need to turn the relay module on and then back off again.
Wrap Up
While this isn’t a simple plug and play solution, it is the easiest option currently available to add both voice control and remote access control to a fence or gate. When looking for a way to do this I discovered many DIY smart gate locks, but they all require circuit boards or fancy programming. Connecting the system here is no harder than wiring a light switch, and the only “programming” involved is creating the routine in your Alexa app or smart home hub.
Instruction for using the discontinued GoControl Relay
Below you can find the original instruction using the GoControl Relay module. If you have this relay, or if you find one here is how to set it up.
Installing the Go-Control Z-Wave Isolated Contact Module (FS20Z-1)
The Go-Control module is powered by 110 volts AC. This can be hardwired into your home’s power or wired to a plug.
If you choose a plug something like this would work.

Wiring the Contact Module
The contact has 5 wires that need to be connected
- Black Wire – Connect to 120VAC power (hot)
- White Wire – Connect to 120VAC neutral
- 2x Blue Wires – Connect to “Push Button” terminal on lock keypad
- Green Wire – Connect to ground
Here’s a diagram to help you get it wired (G0-Control Gate Lock Wiring Diagram)
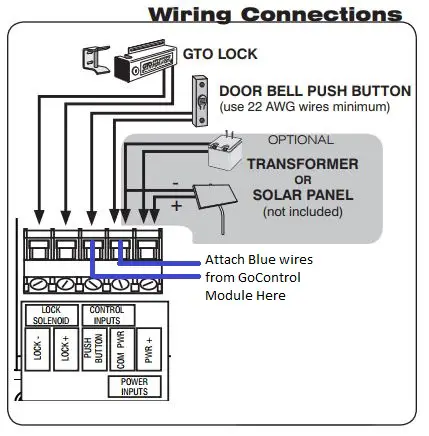
Smart Gate Lock Wiring Diagram Z-Wave Bull Dog
If you install this system, please leave a comment below with any tips or advice you have for someone else.
Thanks for reading and enjoy living high tech.
Jason
17 Comments on “Smart Lock for Outdoor Gate [works with Alexa]”
Great write-up. Thanks for sharing. I can’t wait to give it a try. Any reason this wouldn’t work with Google Home as well?
Brian, Thank you. The same setup should work just fine with Google Home.
Jason
greetings. I would like to do this but I have a couple of questions!
1) the go control module has been discontinued. Would this work? https://www.z-wave.com/shop-z-wave-smart-home-products/smart-lighting-enerwave-enerwave-z-wave-plus-micro-switch-relay
2) I assume this would work with the wink app (instead of or in addition to Alexa) and a wink zwave hub like this one:
https://www.z-wave.com/shop-z-wave-smart-home-products/smart-hubs-wink-wink-z-wave-plus-smart-hub
3) I already have the Bulldog lock. Right now it is hooked up to a wireless push button in my home. Can I leave that connected and add the connection to smarthub too? That way we could open the gate both thru the wink app and manually from our home.
4) my only other worry is that the gate is about 80 feet from our home. If I want to use the hub to remotely connect to other locks (like our front door) will the hub work with both gate and front door locks so far apart?
Thank you – I appreciate the feedback as there is very little out there re: how to smarten up an outside gate lock!
Tracey,
1. The enerwave z-wave switch you suggested won’t work in this application. The enerwave switch passes the 120vac signal used to power it to the load. For the gate lock you need a “dry contact” that just completes the circuit. This relay module from FrotrezZ would be a suitable replacement for the Go-Control Module. I am going to update the article to include a link to it as a replacement for the go control.
2. You are correct, the wink hub would allow you to do the same thing.
3. There shouldn’t be any problem wiring the module in parallel with the existing wireless button. If you do it that way both will control the lock.
4. I can’t give you an answer on this last one. There are too many variables that affect the distance the signal will travel. One thing to keep in mind is that z-wave is a mesh network. That means the signal can be passed from one device to another, so any other z-wave devices between the hub and gate or you front door will act like a repeater.
I hope This helps answer some of your questions.
Thanks,
Jason
I’m not that tech minded. I have an Alexa setup in my house. I have pvc gates I want to lock. I see this post is 2 years old. I have not bought any gate lock yet. What are the current things I need to use Alexa with the bulldog lock?
thank you so much!
No Problem
Hi Jason – any chance you can draw me a wiring diagram for hooking up the bulldog with the Fortrez Z. Also – how is the Fortrez powered…hoping I can plug it in as I’m not sure I will know how to wire it in etc. Hoping this isn’t over my head!
In case it matters, here is the wireless push button I have set up with the Bulldog (along with the push button the Bulldog comes with. So there is a push button near the gate as well as the wireless one in the house). https://www.northshorecommercialdoor.com/heerloragaan.html
Thanks much from a not that handy mom hoping to be able to open the gate for package delivery when we are not here – unfortunately we have quite a problem with porch pirates!
Tracey
Tracey,
I will try and update the article with a diagram for the FortrezZ relay. I will send you an email as soon as it’s there.
Thanks,
Jason
The article has been updated a wiring diagram for the FortrezZ relay.
Will Alexa identify this as a secure lock and ask for an access code like a typical door lock? If not is this possible without picking apart an actual door lock?
Chester, Alexa will see this as a standard smart home device so no access code will be needed.
Jason
Pingback: Suggestions on building my own security system. - YokyHome
I am trying to hook up to alarm.com but it’s reading the signal as a light or a valve but not as a lock.
I have magnetic lock with an enforcer key pad and a sky bell video door bell.
I’m trying to unlock remotely.
No luck.
Any advise.
Thanks.
Hello. Is it required to remove the P5 jumper? I understand that when removing the jumper, it will lock after 9 seconds.
But, I want to have the gate unlocked 0800-1400 every other Wednesday for example.
I want to be able to program lock times, and unlock times.
David, I’m not sure, but maybe someone else might be able to help.
Hello
Can I leave the P5 jumper in?
I want to be able to program it to unlock for a few hours on certain days. Then program to lock again.
Dave